Storj V3 Telemetry Logging and Graphing with Grafana

Decentralised technologies interest me greatly. A sub-section of this genre is decentralised storage, which got its first mass debut with Napster. Napster was a “hybrid” model in that it used servers to coordinate peers… but not long after Napster other peer-2-peer services came along, like Kazaa, Kademlia (the basis for a myriad of p2p services), BitTorrent and very recently the boldly named InterPlantaryFileSystem RAWR. None of these protocols support monetisation. They are embodiments of the sharing economy.

More recently, companies have tried to produce decentralised storage systems which do monetise data storage. The big recent names have been Sia, Ubbey and Storj, with perhaps Urbit hanging around in the background. All of these fledgling systems have had major issues associated with them, which is an interesting discussion in itself. I’ve experimented with at least Sia and Ubbey previously.

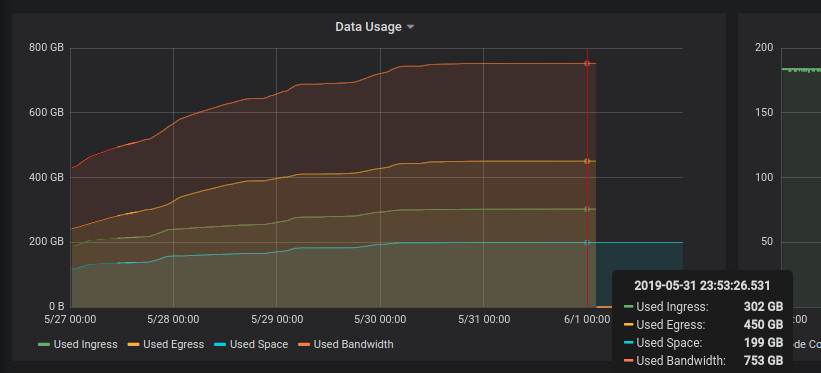
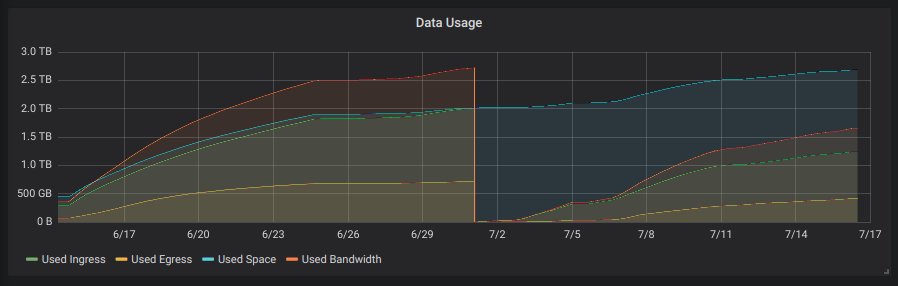
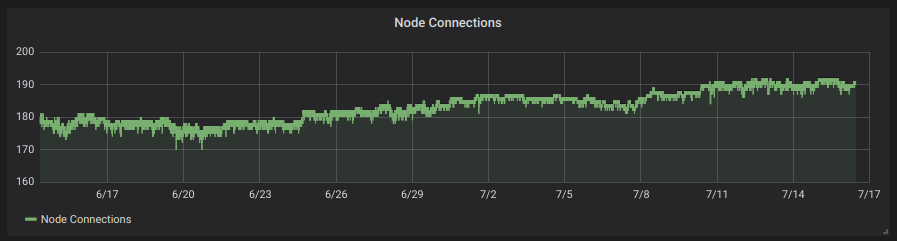
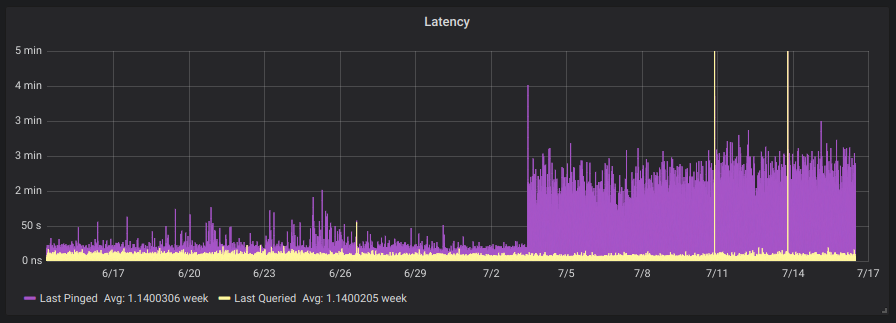
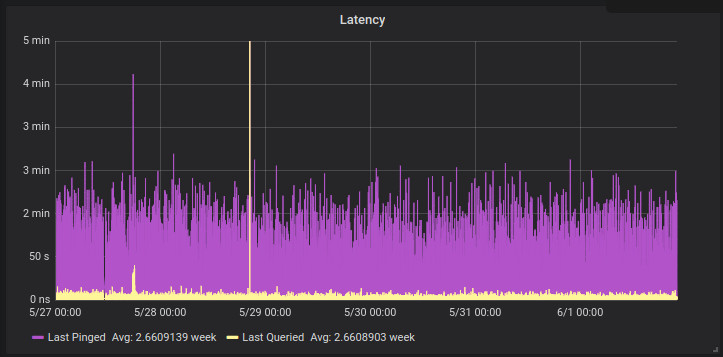
Storj recently announced that they were going to completely overhaul their network based on lessons learnt from their current system (v2) and asked for testers for their new system. I signed up and so far their software has been stable. I’ve written a small app which grabs telemetry from their daemon and inserts it into a Postgres database. Grafana is then used to graph this data.

Grafana Graph showing storage node storage usage
StorageNode data utilisation graph
Storj Storage Node egress, ingress and storage utilisation over the course of a month.
Node connections… is this the entire network ?
Storj Storage Node “Latency”
Bandwidth Usage

To get a small logging system going you’ll need to do this :

Launch a Postgres instance on your Docker-enabled machine :

docker run --name storj-pg --restart=always -v /home/yourhome/pgdata:/var/lib/postgresql/data -d -e POSTGRES_USER="storj" -e POSTGRES_PASSWORD="storj" postgres

Launch Grafana (if you don’t already have it) :

docker run --restart=always -d -p 3000:3000 --name=grafana -v /home/yourhome/grafana-data:/var/lib/grafana --link storj-pg:storj-pg grafana/grafana
# You can also use a network to link these machines, which is the new way of doing things and is a fair bit sexier than the "link" directive.

and then launch my app (to generate the initial config) :

docker run -ti --rm --detach=false -v /home/yourhome/telemetryconfig:/config aquarat/storj-postgres-logger:0.3a app -configfile=/config/config.json

My app will create a config file in the host directory, which you will need to modify to suit your installation. Once that’s done, relaunch it to check it works :

docker run --detach=false --rm --link storj-pg:storj-pg --link storagenode:storagenode -v /home/yourhome/telemetryconfig.json:/app/config.json aquarat/storj-postgres-logger:0.3a

Once you know it works you can relaunch it in the background :

docker run -d --name="pg-logger" --restart=always --link storj-pg:storj-pg --link storagenode:storagenode -v /home/yourhome/telemetryconfig:/config aquarat/storj-postgres-logger:0.3a app -configfile=/config/config.json

You can monitor the logger with docker logs -f pg-logger

The payload inserted into the table will look like this :

{"node_id":"xxxTz8ZhctRT7SmdWmwVMYYGhab1BkL2HXEH9LfCjvgBHTyEKvF","node_connections":183,"bootstrap_address":"bootstrap.storj.io:8888","external_address":"hansie.com:28967","stats":{"used_space":136240764928,"available_space":7863759235072,"used_ingress":213188739072,"used_egress":284742114304,"used_bandwidth":497930853376,"available_bandwidth":19502069146624},"uptime":{"seconds":1616778,"nanos":894016912},"last_pinged":{"seconds":1558951645,"nanos":705568818},"last_queried":{"seconds":1558951645,"nanos":938984110}}

The associated Grafana query to pull these values out of the database looks like this :

Storj StorageNode Latency Graph showing ISP glitch
Grafana graph showing StorageNode Latencies with an ISP “glitch” on the 29th of May 2019.

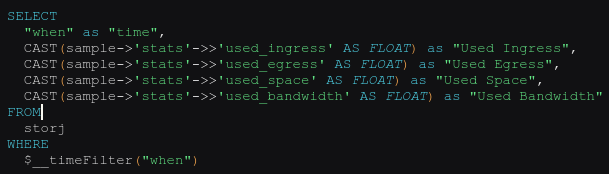
Of course Docker isn’t required for any of this and “links” are only needed when containers aren’t on the same docker network.

DockerHub Autobuilds for Multiple Architectures (cross-compilation)

What a mouthful that title is. This post is a WIP.

I recently discovered the joys (😉) of running docker containers on armhf and arm64 machines. This is a quick guide, mostly for myself, so I can reproduce the steps to creating dockerhub autobuilding images for multiple architectures.

AKA If you have a project, hosted in a public repository like Github or Bitbucket and your project may be run in a docker container on hosts with different CPU architectures, this is how you can get DockerHub to Autobuild your project.

Start by enabling "experimental" CLI features in your docker client : (add the "experimental" key and value)

cat ~/.docker/config.json 
{
        "auths": {
                "https://index.docker.io/v1/": {}
        },
        "HttpHeaders": {
                "User-Agent": "Docker-Client/17.12.1-ce (linux)"
        },
        "credsStore": "secretservice",
        "experimental": "enabled"
}

and your docker daemon : (and again, add "experimental")

cat /etc/docker/daemon.json 
{
    "experimental": true,
    "runtimes": {
        "nvidia": {
            "path": "nvidia-container-runtime",
            "runtimeArgs": []
        }
    }
}

Either create a new repository on DockerHub using the web interface or push an existing image to DockerHub (which automatically creates the repository) :

docker push aquarat/volantmq:amd64

In your repository, create the file structure described below and populate them accordingly. The documentation for this structure can be found here.
File structure : (largely lifted from this awesome Github answer)

├── Dockerfile
├── Dockerfile.aarch64
├── Dockerfile.armhf
└── hooks
    ├── build
    ├── post_checkout
    └── pre_build

hooks/build :

#!/bin/bash

docker build 
    --file "${DOCKERFILE_PATH}" 
    --build-arg BUILD_DATE="$(date -u +"%Y-%m-%dT%H:%M:%SZ")" 
    --build-arg VCS_REF="$(git rev-parse --short HEAD)" 
    --tag "$IMAGE_NAME" 
    .

hooks/post_checkout:

#!/bin/bash

BUILD_ARCH=$(echo "${DOCKERFILE_PATH}" | cut -d '.' -f 2)

[ "${BUILD_ARCH}" == "Dockerfile" ] && 
    { echo 'qemu-user-static: Download not required for current arch'; exit 0; }

QEMU_USER_STATIC_ARCH=$([ "${BUILD_ARCH}" == "armhf" ] && echo "${BUILD_ARCH::-2}" || echo "${BUILD_ARCH}")
QEMU_USER_STATIC_DOWNLOAD_URL="https://github.com/multiarch/qemu-user-static/releases/download"
QEMU_USER_STATIC_LATEST_TAG=$(curl -s https://api.github.com/repos/multiarch/qemu-user-static/tags 
    | grep 'name.*v[0-9]' 
    | head -n 1 
    | cut -d '"' -f 4)

curl -SL "${QEMU_USER_STATIC_DOWNLOAD_URL}/${QEMU_USER_STATIC_LATEST_TAG}/x86_64_qemu-${QEMU_USER_STATIC_ARCH}-static.tar.gz" 
    | tar xzv

hooks/pre_build:

#!/bin/bash

BUILD_ARCH=$(echo "${DOCKERFILE_PATH}" | cut -d '.' -f 2)

[ "${BUILD_ARCH}" == "Dockerfile" ] && 
    { echo 'qemu-user-static: Registration not required for current arch'; exit 0; }

docker run --rm --privileged multiarch/qemu-user-static:register --reset

Dockerfile -> Your standard amd64 Dockerfile.
An example of the start of this would be VolantMQ’s Dockerfile :

cat Dockerfile.armhf 

FROM golang:1.11.1 as builder
LABEL stage=intermediate

and now Dockerfile.armhf, our armhf build :

cat Dockerfile.armhf 

FROM golang:1.11.1 as builder
LABEL stage=intermediate

COPY qemu-arm-static /usr/bin/

"qemu-arm-static" is a binary executable that acts as an emulator for armhf executables. It is downloaded by the pre_build script, which is called by DockerHub during the autobuild.

Dockerfile.aarch64:

cat Dockerfile.aarch64 
FROM golang:1.11.1 as builder
LABEL stage=intermediate

COPY qemu-aarch64-static /usr/bin/

In order to allow the docker container to use this emulator you’ll need to register it as a binary executable handler (this tells the kernel how to deal with specific files). This should be covered by pre_build, but in case it isn’t: In Ubuntu install qemu-user-static :

qemu-user-static

or execute a docker image :

docker run --rm --privileged vicamo/binfmt-qemu:latest

Once you’ve got this done, you can test your builds locally, like so :

DOCKERFILE_PATH=Dockerfile.aarch64 IMAGE_NAME=aquarat/volantmq:latest-aarch64 bash -c "hooks/post_checkout && hooks/build"
DOCKERFILE_PATH=Dockerfile.armhf IMAGE_NAME=aquarat/volantmq:latest-arm bash -c "hooks/post_checkout && hooks/build"
DOCKERFILE_PATH=Dockerfile IMAGE_NAME=aquarat/volantmq:latest-amd64 bash -c "hooks/post_checkout && hooks/build"

If that works, you can get pave the way for the dockerhub manifest by pushing your newly-created images to dockerhub:

docker push aquarat/volantmq:latest-amd64
docker push aquarat/volantmq:latest-arm64
docker push aquarat/volantmq:latest-arm

You may need to log your docker client in : docker login

You should then commit your changes to your repository and push.

You’ll need to annotate your manifest images :

# Create a manifest that describes your DockerHub repository
# This takes the form of the multi-arch "virtual" image and then its constituent images.
docker manifest create aquarat/volantmq:latest aquarat/volantmq:aarch64 aquarat/volantmq:armhf aquarat/volantmq:amd64

# Tag each non-amd64 image apropriately
docker manifest annotate aquarat/volantmq:latest aquarat/volantmq:armhf --os linux --arch arm
docker manifest annotate aquarat/volantmq:latest aquarat/volantmq:aarch64 --os linux --arch arm64 --variant armv8

# and then push your changes to DockerHub
docker manifest push aquarat/volantmq

# and then to inspect the result :
docker run --rm mplatform/mquery aquarat/volantmq

Connect your dockerhub account to your Bitbucket/Github account. This can be found in your dockerhub profile page : https://cloud.docker.com/u/somecoolnick/settings

Go back to your repository, click the “Builds” tab and click “Configure Automated Builds”.

Set up the source repository.

and then set up some build rules :

dockerhub’s build rules page

Click “Save and Build” and watch what happens. It takes a while to build.

ESKOM-friendly home hosting on 64bit ARM SBCs

How to host websites and services on a fibre line while enduring regular power failures.

This website was hosted on an Intel NUC, sporting an Intel i7 CPU and a luxurious 32GBs of RAM. Serving websites from your home is viable when you have 100mbit symmetric fibre (You are awesome Vumatel). Unfortunately, South Africa occasionally can’t supply enough power to meet the demand of its public at which point South Africans experience load shedding.

My home was recently load shed for 5 hours a day on several days during the course of a week – and that got me thinking; why am I hosting relatively static content on a machine that uses around 200W of electricity when I could probably cut down on electricity costs by switching to a lower power machine and SSDs ? (I can’t switch everything, but small websites are a good target)

This seemed like the perfect time to try out Debian BUSTER for 64-bit ARM rawr. Running docker on a Pi with 1GB of RAM is probably a ridiculous, but it’s surprisingly usable. Better yet, you can run a Pi from a USB power bank for several hours, and UPS-like switch-over functionality is included as part of the deal (most of the time…) It’s got to be the cheapest way to reliably host anything and it reduces the power bill.

The first step is getting your routers to stay powered during a power failure. Decent routers usually have a Power-over-Ethernet capability and Mikrotik is no exception. Mikrotik makes a relatively inexpensive POE UPS for their routers called the mups. The mups is small, cheap and simply plugs in between the router and the existing POE source. It charges a 12V battery (you choose the size) and seamlessly switches to it in the event of a power failure.

The way a Mikrotik MUPS is supposed to look.

You might ask “Why can’t I use a normal UPS to power my routers ?” – you can, but a normal UPS has a battery and in order to power your equipment it has to take the battery power (DC), modulate it, send it through a step-up transformer and out to your device. Your device will generally take that AC 240V, step it down, rectify it (demodulate it) to DC and then use it. By stepping up and back down again you’re introducing a lot of inefficiency into the process, which translates into bigger batteries and big equipment. Mikrotik routers (like many routers) expect 10V-30V input – so when the power goes out and a MUPS is in use, the MUPS simply directly connects the battery to the router. The product is a simple battery can power a small Mikrotik router for several hours with almost no heat output and complete silence.

A 12V 7AH battery, Mikrotik MUPS with cover removed and Mikrotik HAP 802.11AC dual band router.

This thing is a beast – and works well on a MUPS despite the datasheet indicating otherwise. (Mikrotik RB4011)

Installing the Debian Buster preview image is easy, their wiki pretty-much does everything for you :

$ wget https://people.debian.org/~gwolf/raspberrypi3/20190206/20190206-raspberry-pi-3-buster-PREVIEW.img.xz
$ xzcat 20190206-raspberry-pi-3-buster-PREVIEW.img.xz | dd of=/dev/sdX bs=64k oflag=dsync status=progress```

I found I had to do a few things to get things running smoothly :
Set a timezone : tzselect
Set the hostname and associated hosts entry : /etc/hosts and /etc/hostname
Install locales : apt install locales
Install dpkg-reconfigure : apt install debconf
Reconfigure locales : dpkg-reconfigure locales (this gets rid of the missing locale error message)
Install some other stuff : apt install ntp build-essential byobu atop htop sudo

That’s what’s hosting this website.

If your Pi is on a reliable battery-backup* you can enable write-caching :

In /etc/fstab :

LABEL=RASPIROOT / ext4 rw,async,commit=500,noatime,discard,nodiratime 0 1
rw – read/write
async – asynchronously read and write (dangerous with a battery)
commit=500 – the amount of time the fs waits before forcicbly flushing buffers to disk (500 seconds)
noatime – don’t update access times on files
discard – use the TRIM command to tell the SSD what blocks are no longer in use (this often doesn’t work, but I’ve found it works on high-end modern Sandisk and Samsung SD/MicroSD cards)
nodiratime – don’t write the access time for directories

You’ll want to create a user account for yourself with sudo privileges :

usermod -aG sudo username

And add your ssh key: (from desktop) $ ssh-copy-id username@rpi
Test the login and then don’t forget to disable root login via ssh.

Install docker-ce for Debian – don’t forget to add your new user to the docker group :

sudo usermod -aG docker your-user

To install docker-compose you’ll need python3 and pip : apt install python3-pip python3

and then “pip3 install docker-compose”. It works beautifully.

And that’s about it. You may find that some common images don’t have variants available for arm64, but rebuilding them is educational in itself 🙂

Often cloning the repository associated with the image you want and then running “docker build -t mynickname/a-project:version .” is enough to generate arm arm64 variant of the project. You can then push the image to docker-hub for use with docker-compose by going “docker push mynickname/a-project:version”. You may need to log in first though : “docker login”.

It’s amazing what low-end hardware can do. And this is behind a firewall in a DMZ – so don’t worry about those 0.0.0.0s.

And yes, one might argue that publishing the above is a security risk… but then one might counter with “obfuscation isn’t security”.

Not bad for a machine hosting 9 websites. The SSD is an “endurance” SSD, so a bit of swapping shouldn’t be a problem. 

A side effect of this process was the discovery that Ghost is a real RAM-hog and CPU-inefficient. WordPress uses < 10% of the RAM Ghost uses… and the WordPress sites are a lot more complex. WordPress also responds faster than Ghost, so it may be time to switch.

AuroraDAO’s Aurad on an arm64 Raspberry Pi 3B+

Recently, AuroraDAO launched their tier 3 staking for their decentralised exchange, IDEX.

The software required to participate in their staking system is relatively simple; it takes the form of a docker-compose recipe that launches three containers, namely Parity (in light mode), MySQL 5.7 (not MariaDB) and a container running their software on Node. I tried running this software on an Intel i5 NUC thinking that it’d require some reasonable hardware to work properly. Some users started asking if it was possible to run aurad on low-power hardware, like a Raspberry Pi. Initially I thought this wasn’t viable… but then I started looking at the utilisation on my i5 NUC and realised it had barely any utilisation – staking on a Pi might be viable after all…

As an experiment I set about trying to get aurad running on an Asus Tinkerboard, which is a 32-bit quad-core arm device with 2GBs of RAM (1.8 GHz default clock). The result was successful and aurad runs really well on it. I then rebuilt the aurad setup on a testing image of Debian’s Buster release, which is arm64… and surprisingly that also works really well. Amazingly the arm64 architecture has better support than armhf (32 bit) in a number of areas.

So for those who are willing to get their hands a little dirty, here’s everything you need to get started with aurad and a Raspberry Pi 3B:

You’ll need my spiffy ready-to-go Raspberry Pi image : https://storage.googleapis.com/aquarat-general/aurapi.img.xz

Decompress and write the image to a suitable microSDXC card. You’ll need something that’s at least 32GBs in size. I based my tests on a Samsung EVO+ 128GB microSD card. Note that your Pi3 will have to work very hard to run this image, so make sure it has a good quality power source. I’ve been powering mine through the headers directly.

Once the image has been decompressed and written you can stick the SD card into your Pi and power it up. It’ll get an IP from your DHCP server (I haven’t tested it with wifi). Once it has an IP, log in :

ssh debian@yourpi (password raspberry).

Once you’re logged in, configure aurad :

aura config

Once configured, start aurad :

aura start

It’ll take a little while for the containers to start and then it’ll take some time for the machine to synchronise. You can check the sync progress by running :

docker logs -f docker_aurad_1

aurad running on a Raspberry Pi 3B with an arm64 kernel.

The image supplied here relies on some modifications to Aurora’s script. The docker-compose file has been modified to use mariadb’s dockerhub repository (specifically MariaDB 10.4), as MariaDB supports arm64 (and is better :P). Aurad’s docker image has an amd64 dependency hard-coded, so this was rebuilt with a modified dockerfile which uses an armhf (32 bit) dependency. Parity only supports x86_64 as a target architecture on their dockerhub repository, so I rebuilt this using a customised dockerfile (rebuilt on an arm 32bit device… it took a while).

RAM is a bit scarce on the Pi3 so a swap file is a good idea (most of the RAM contents are inactive). This is after 6 hours of uptime. The machine seems to limit itself to 540MB of real RAM usage.
25% of the system RAM is being used as cache… which isn’t undesirable.

It should go without saying that Aurora doesn’t support this image and that by using this image you’re trusting I haven’t embedded something funky in the images. Also, updating the containers will involve a little bit of fun.

You shouldn’t need a heatsink for your Pi; my Pi says it’s running at 55 degrees C currently (in a 26 degree C room).

The major resource hog is Parity, which is responsible for around 20% of the machine’s RAM usage. I suspect moving Parity to another ARM SBC would free up a lot of resources, improve stability and would still use far less electricity than a “normal” x86 machine (10W vs 100W?).

Good luck!

Post image taken from Wikipedia which in turn got it from Flickr, created by ghalfacree at https://flickr.com/photos/120586634@N05/39906369025. It was reviewed on 16 March 2018 by FlickreviewR 2 and was confirmed to be licensed under the terms of the cc-by-sa-2.0.