DockerHub Autobuilds for Multiple Architectures (cross-compilation)

What a mouthful that title is. This post is a WIP.

I recently discovered the joys (πŸ˜‰) of running docker containers on armhf and arm64 machines. This is a quick guide, mostly for myself, so I can reproduce the steps to creating dockerhub autobuilding images for multiple architectures.

AKA If you have a project, hosted in a public repository like Github or Bitbucket and your project may be run in a docker container on hosts with different CPU architectures, this is how you can get DockerHub to Autobuild your project.

Start by enabling "experimental" CLI features in your docker client : (add the "experimental" key and value)

cat ~/.docker/config.json 
{
        "auths": {
                "https://index.docker.io/v1/": {}
        },
        "HttpHeaders": {
                "User-Agent": "Docker-Client/17.12.1-ce (linux)"
        },
        "credsStore": "secretservice",
        "experimental": "enabled"
}

and your docker daemon : (and again, add "experimental")

cat /etc/docker/daemon.json 
{
    "experimental": true,
    "runtimes": {
        "nvidia": {
            "path": "nvidia-container-runtime",
            "runtimeArgs": []
        }
    }
}

Either create a new repository on DockerHub using the web interface or push an existing image to DockerHub (which automatically creates the repository) :

docker push aquarat/volantmq:amd64

In your repository, create the file structure described below and populate them accordingly. The documentation for this structure can be found here.
File structure : (largely lifted from this awesome Github answer)

β”œβ”€β”€ Dockerfile
β”œβ”€β”€ Dockerfile.aarch64
β”œβ”€β”€ Dockerfile.armhf
└── hooks
    β”œβ”€β”€ build
    β”œβ”€β”€ post_checkout
    └── pre_build

hooks/build :

#!/bin/bash

docker build 
    --file "${DOCKERFILE_PATH}" 
    --build-arg BUILD_DATE="$(date -u +"%Y-%m-%dT%H:%M:%SZ")" 
    --build-arg VCS_REF="$(git rev-parse --short HEAD)" 
    --tag "$IMAGE_NAME" 
    .

hooks/post_checkout:

#!/bin/bash

BUILD_ARCH=$(echo "${DOCKERFILE_PATH}" | cut -d '.' -f 2)

[ "${BUILD_ARCH}" == "Dockerfile" ] && 
    { echo 'qemu-user-static: Download not required for current arch'; exit 0; }

QEMU_USER_STATIC_ARCH=$([ "${BUILD_ARCH}" == "armhf" ] && echo "${BUILD_ARCH::-2}" || echo "${BUILD_ARCH}")
QEMU_USER_STATIC_DOWNLOAD_URL="https://github.com/multiarch/qemu-user-static/releases/download"
QEMU_USER_STATIC_LATEST_TAG=$(curl -s https://api.github.com/repos/multiarch/qemu-user-static/tags 
    | grep 'name.*v[0-9]' 
    | head -n 1 
    | cut -d '"' -f 4)

curl -SL "${QEMU_USER_STATIC_DOWNLOAD_URL}/${QEMU_USER_STATIC_LATEST_TAG}/x86_64_qemu-${QEMU_USER_STATIC_ARCH}-static.tar.gz" 
    | tar xzv

hooks/pre_build:

#!/bin/bash

BUILD_ARCH=$(echo "${DOCKERFILE_PATH}" | cut -d '.' -f 2)

[ "${BUILD_ARCH}" == "Dockerfile" ] && 
    { echo 'qemu-user-static: Registration not required for current arch'; exit 0; }

docker run --rm --privileged multiarch/qemu-user-static:register --reset

Dockerfile -> Your standard amd64 Dockerfile.
An example of the start of this would be VolantMQ’s Dockerfile :

cat Dockerfile.armhf 

FROM golang:1.11.1 as builder
LABEL stage=intermediate

and now Dockerfile.armhf, our armhf build :

cat Dockerfile.armhf 

FROM golang:1.11.1 as builder
LABEL stage=intermediate

COPY qemu-arm-static /usr/bin/

"qemu-arm-static" is a binary executable that acts as an emulator for armhf executables. It is downloaded by the pre_build script, which is called by DockerHub during the autobuild.

Dockerfile.aarch64:

cat Dockerfile.aarch64 
FROM golang:1.11.1 as builder
LABEL stage=intermediate

COPY qemu-aarch64-static /usr/bin/

In order to allow the docker container to use this emulator you’ll need to register it as a binary executable handler (this tells the kernel how to deal with specific files). This should be covered by pre_build, but in case it isn’t: In Ubuntu install qemu-user-static :

qemu-user-static

or execute a docker image :

docker run --rm --privileged vicamo/binfmt-qemu:latest

Once you’ve got this done, you can test your builds locally, like so :

DOCKERFILE_PATH=Dockerfile.aarch64 IMAGE_NAME=aquarat/volantmq:latest-aarch64 bash -c "hooks/post_checkout && hooks/build"
DOCKERFILE_PATH=Dockerfile.armhf IMAGE_NAME=aquarat/volantmq:latest-arm bash -c "hooks/post_checkout && hooks/build"
DOCKERFILE_PATH=Dockerfile IMAGE_NAME=aquarat/volantmq:latest-amd64 bash -c "hooks/post_checkout && hooks/build"

If that works, you can get pave the way for the dockerhub manifest by pushing your newly-created images to dockerhub:

docker push aquarat/volantmq:latest-amd64
docker push aquarat/volantmq:latest-arm64
docker push aquarat/volantmq:latest-arm

You may need to log your docker client in : docker login

You should then commit your changes to your repository and push.

You’ll need to annotate your manifest images :

# Create a manifest that describes your DockerHub repository
# This takes the form of the multi-arch "virtual" image and then its constituent images.
docker manifest create aquarat/volantmq:latest aquarat/volantmq:aarch64 aquarat/volantmq:armhf aquarat/volantmq:amd64

# Tag each non-amd64 image apropriately
docker manifest annotate aquarat/volantmq:latest aquarat/volantmq:armhf --os linux --arch arm
docker manifest annotate aquarat/volantmq:latest aquarat/volantmq:aarch64 --os linux --arch arm64 --variant armv8

# and then push your changes to DockerHub
docker manifest push aquarat/volantmq

# and then to inspect the result :
docker run --rm mplatform/mquery aquarat/volantmq

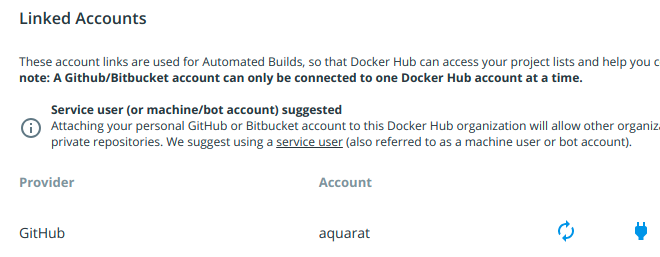
Connect your dockerhub account to your Bitbucket/Github account. This can be found in your dockerhub profile page : https://cloud.docker.com/u/somecoolnick/settings

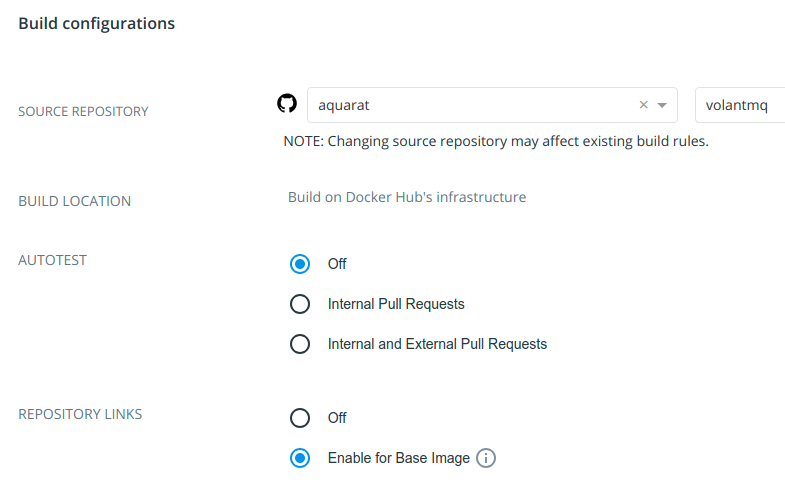
Go back to your repository, click the “Builds” tab and click “Configure Automated Builds”.

Set up the source repository.

and then set up some build rules :

dockerhub’s build rules page

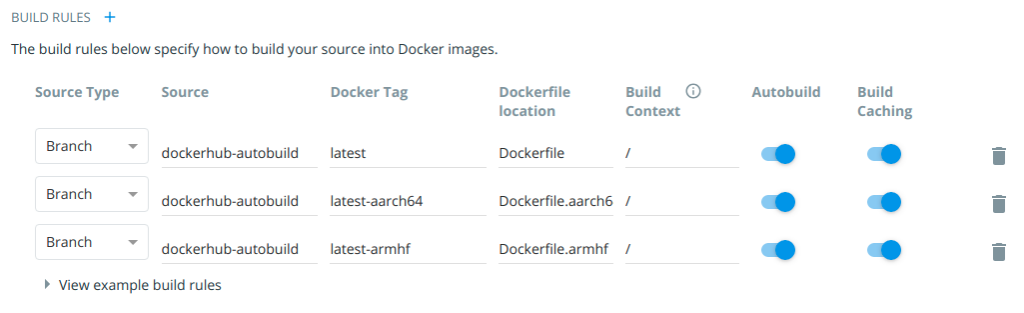
Click “Save and Build” and watch what happens. It takes a while to build.

ESKOM-friendly home hosting on 64bit ARM SBCs

How to host websites and services on a fibre line while enduring regular power failures.

This website was hosted on an Intel NUC, sporting an Intel i7 CPU and a luxurious 32GBs of RAM. Serving websites from your home is viable when you have 100mbit symmetric fibre (You are awesome Vumatel). Unfortunately, South Africa occasionally can’t supply enough power to meet the demand of its public at which point South Africans experience load shedding.

My home was recently load shed for 5 hours a day on several days during the course of a week – and that got me thinking; why am I hosting relatively static content on a machine that uses around 200W of electricity when I could probably cut down on electricity costs by switching to a lower power machine and SSDs ? (I can’t switch everything, but small websites are a good target)

This seemed like the perfect time to try out Debian BUSTER for 64-bit ARM rawr. Running docker on a Pi with 1GB of RAM is probably a ridiculous, but it’s surprisingly usable. Better yet, you can run a Pi from a USB power bank for several hours, and UPS-like switch-over functionality is included as part of the deal (most of the time…) It’s got to be the cheapest way to reliably host anything and it reduces the power bill.

The first step is getting your routers to stay powered during a power failure. Decent routers usually have a Power-over-Ethernet capability and Mikrotik is no exception. Mikrotik makes a relatively inexpensive POE UPS for their routers called the mups. The mups is small, cheap and simply plugs in between the router and the existing POE source. It charges a 12V battery (you choose the size) and seamlessly switches to it in the event of a power failure.

The way a Mikrotik MUPS is supposed to look.

You might ask “Why can’t I use a normal UPS to power my routers ?” – you can, but a normal UPS has a battery and in order to power your equipment it has to take the battery power (DC), modulate it, send it through a step-up transformer and out to your device. Your device will generally take that AC 240V, step it down, rectify it (demodulate it) to DC and then use it. By stepping up and back down again you’re introducing a lot of inefficiency into the process, which translates into bigger batteries and big equipment. Mikrotik routers (like many routers) expect 10V-30V input – so when the power goes out and a MUPS is in use, the MUPS simply directly connects the battery to the router. The product is a simple battery can power a small Mikrotik router for several hours with almost no heat output and complete silence.

A 12V 7AH battery, Mikrotik MUPS with cover removed and Mikrotik HAP 802.11AC dual band router.

This thing is a beast – and works well on a MUPS despite the datasheet indicating otherwise. (Mikrotik RB4011)

Installing the Debian Buster preview image is easy, their wiki pretty-much does everything for you :

$ wget https://people.debian.org/~gwolf/raspberrypi3/20190206/20190206-raspberry-pi-3-buster-PREVIEW.img.xz
$ xzcat 20190206-raspberry-pi-3-buster-PREVIEW.img.xz | dd of=/dev/sdX bs=64k oflag=dsync status=progress```

I found I had to do a few things to get things running smoothly :
Set a timezone : tzselect
Set the hostname and associated hosts entry : /etc/hosts and /etc/hostname
Install locales : apt install locales
Install dpkg-reconfigure : apt install debconf
Reconfigure locales : dpkg-reconfigure locales (this gets rid of the missing locale error message)
Install some other stuff : apt install ntp build-essential byobu atop htop sudo

That’s what’s hosting this website.

If your Pi is on a reliable battery-backup* you can enable write-caching :

In /etc/fstab :

LABEL=RASPIROOT / ext4 rw,async,commit=500,noatime,discard,nodiratime 0 1
rw – read/write
async – asynchronously read and write (dangerous with a battery)
commit=500 – the amount of time the fs waits before forcicbly flushing buffers to disk (500 seconds)
noatime – don’t update access times on files
discard – use the TRIM command to tell the SSD what blocks are no longer in use (this often doesn’t work, but I’ve found it works on high-end modern Sandisk and Samsung SD/MicroSD cards)
nodiratime – don’t write the access time for directories

You’ll want to create a user account for yourself with sudo privileges :

usermod -aG sudo username

And add your ssh key: (from desktop) $ ssh-copy-id username@rpi
Test the login and then don’t forget to disable root login via ssh.

Install docker-ce for Debian – don’t forget to add your new user to the docker group :

sudo usermod -aG docker your-user

To install docker-compose you’ll need python3 and pip : apt install python3-pip python3

and then “pip3 install docker-compose”. It works beautifully.

And that’s about it. You may find that some common images don’t have variants available for arm64, but rebuilding them is educational in itself πŸ™‚

Often cloning the repository associated with the image you want and then running “docker build -t mynickname/a-project:version .” is enough to generate arm arm64 variant of the project. You can then push the image to docker-hub for use with docker-compose by going “docker push mynickname/a-project:version”. You may need to log in first though : “docker login”.

It’s amazing what low-end hardware can do. And this is behind a firewall in a DMZ – so don’t worry about those 0.0.0.0s.

And yes, one might argue that publishing the above is a security risk… but then one might counter with “obfuscation isn’t security”.

Not bad for a machine hosting 9 websites. The SSD is an “endurance” SSD, so a bit of swapping shouldn’t be a problem. 

A side effect of this process was the discovery that Ghost is a real RAM-hog and CPU-inefficient. WordPress uses < 10% of the RAM Ghost uses… and the WordPress sites are a lot more complex. WordPress also responds faster than Ghost, so it may be time to switch.

Obsessive Home Automation

This is a quick deep dive into home automation with Home Assistant. Home automation is a very wide and complex topic, this post is mostly an overview of what I’ve personally found possible so far.

I bought my house back in 2011. The garden came with an irrigation system, but no valves and no automation. I went looking for valves and a suitable controller… but they were terrible; they had horrible LCD displays that required cryptographic experience to interpret and they cost a ton. The house’s alarm system also sucked. I never figured out how to operate it.

Back before Raspberry Pis if you wanted TCP/IP you needed a Phidget component.

Irritrol. It’s disgusting.

This was 2011 and that meant there were no Raspberry Pis. I automated the garden irrigation system by using Arduino (Atmel Atmega328P) MCUs, controlling relays on a long 100m I2C line around the garden. Using some tricks I managed to get the Arduinos down to 500 Hz and that was reliable enough.

Fortunately, things have changed; 2012 came, the Raspberry Pi 1 hit the market and suddenly these devices could be networked using Ethernet for a fee that wasn’t insane. Then came 2016 and the WiFi-enabled Espressif esp8266 MCU graced us with its incredible price point of ~$4.00 and tiny size. Initially your coding choices were Arduino or Lua but eventually MicroPython took away that world of hurt. MicroPython RAWKS.

Circa 2016, a very untidy ESP8266 borehole controller, temperature/humidity sensor and irrigation valve controller.

Olimex’s take on an esp8266 – this one controls lighting, a pool pump and monitors sand filter input pressure.

At this point I had automated some parts of my home, but all using bespoke code, communicating through an MQTT broker/server. This worked, but it wasn’t user-friendly. Great for cron-based irrigation control, crap for turning on lights during an evening with friends.

The pool pump never turns on at the wrong time.

Then, per chance, I came across Home Assistant. Initially I wanted to use it with a hacked Xiaomi Air Purifier (that’s a story on its own), but as I experimented with it I realise it had the ability to radically improve the usability of my existing home automation. I decided to give it a proper try and started configuring it to talk to my existing devices.


The first Hass experiment was a lonely Raspberry Pi 3B with a super crap 16GB Sandisk MicroSD card. Even in this configuration both Hass and InfluxDB were completely usable.

All my stuff was JSON-MQTT based in that my home-grown devices emitted (and ingested) JSON payloads via the MQTT broker. This was trivial to hand to Hass thanks to Hass’s “value_template” configuration directive:

A sample of Home Assistant’s JSONPath value templating for an electricity sensor that measure utility voltage.

Hass’s web-frontend representation of the compound results of the above sensor.

The sensor above is an EKM power meter, running on an RS422 bridge. A Golang application I wrote, running in a docker container on Hass talks to the meter via the bridge and sends the results to Hass via MQTT as a JSON object. Home Assistant is a collection of docker containers running on a machine (in my case an Arm single board computer).

A neat graph showing power consumption over the last 24 hours.

Hass has basic graphing functionality built-in, but for SUPER COOL FUN I installed the InfluxDB/Chronograf “add-on”.

I had never heard of InfluxDB… damn it’s cool:

Interactive graphs rock. This one shows power usage in watts.

I could sing InfluxDB’s praises for a long time… it’s unbelievably cool… but I’ll leave that for another day.

I neeeed moar GRAPHz…


It’s like eating candy and has similar health issues.

A Soil Moisture Sensor rendered in Grafana from data in InfluxDB.

Did I mention the soil moisture sensors ?


A small subset of soil moisture sensors in the house and garden. Also, gotta love the poop emoji.

For ages I had been looking for a soil moisture sensor solution, but they were all terrible and relatively expensive. I started with the Chirp from Tindie… but they aren’t wireless, they’re bare boards and as such they don’t last.


Dope.

I then tried an awesome solution by “ProtoArt” on Tindie called the GreenThumb (these are no longer for sale). These are esp8266 based. They worked really well and had some cleverness built in (frequency-resonance sensing of soil constituents), but it was also a bare board and esp8266s aren’t known to be light on battery use.

It’s 2019, enter…

The HHCC (also branded as Xiaomi Flora) soil moisture sensor. This is Bluetooth Low Energy-based. It does moisture, conductivity, light and temperature. It is rain-proof (it has internal seals), relatively affordable, aesthetically unobtrusive and critically the capacitance plates are embedded in the PCB, so should last a long time (compared to the Chirp probe where the sensing plates are traces on the outside of the PCB). Some awesome people have teared down the unit and the protocol is well understood.

I use a FriendlyArm NanoPi Air in a 3D printed case as a bridge/gateway between the sensors and the MQTT broker (and therefore both Hass and InfluxDB).

A NanoPi Air by FriendlyArm. This is a quad-core armhf machine with embedded WiFi, Bluetooth and an onboard eMMC device.

It runs nicely on a Mikrotik Router’s USB port. WiFi and soil moisture sensing.

Spot the soil moisture sensor.

All of these things can (and are) beautifully abstracted out into the Home Assistant web frontend, which runs nicely in both desktop Chrome and my phone’s browser. This got me thinking, maybe I should bring EVERYTHING into the MQTT broker?!? It’d have to be done properly because visions of the Mr Robot scene where a house goes bezerk are a real possibility where everything can be hacked and remotely controlled. Securing a home IOT network is an interesting topic on its own… maybe I’ll write about that next.

Back to apocalyptic home automation: A company called Itead makes a variety of switches which are meant to replace normal wall light switches. Crucially, these devices all use esp8266s inside, which means, with some finger gymnastics, they can be reprogrammed with custom firmware.

Yeah, you have to short R19 to ground during flashing, lots of fun. Also be sure to clear the RF MCU memory to avoid “ghost” switching πŸ˜€

The result of abstracting physical lights using MQTT as an API of sorts and Hass as a frontend.

Unfortunately, my house was built in the 80s and Sonoff devices need a neutral line to function. The idea of putting a neutral line in a light switch wall unit in the 80s would have seemed silly because switches only switch loads, they aren’t loads in and of themselves. Rewiring my house to have smart light switches has been a trial.

And some of this required work in the roof…

This was really quite painful.

But, now we have this:

Yes, the air-conditioning is also controlled by Hass. It gives me tremendous pleasure to find a use for a tablet computer from 2013 that has sat gathering dust for years. The light plate behind it used to house 5 switches, all of which have been abstracted and reconfigured in various ways. The tablet itself is stuck on using velcro and is powered by an over-specced PSU in the wall. The tablet is set up to limit the charge of its battery to extend the life of the unit. The interface is a web-app being run on the tablet by WallPanel (an open source app by ThanksMister). The web part of the interface is called HADashboard. This is what the YAML for it looks like :

The layout portion of the HADashboard YAML, which relies on additional definitions.

Some of the definitions used in the dashboard.

This system knows when my phone is on the network, it knows when there’s movement in the house (by virtue of being the alarm system – more on that later) and it can switch pretty much everything. The result is, I don’t have to turn on or turn off lights and when I do want to turn things on an off, I can do it from my phone, anywhere there’s internet connectivity. Once again, this is a complex subject suited to it’s own post.

An example auto-lighting automation. It needs some work, but it’s functional.

I hope you enjoyed this quick dive into obsessive home automation with Home Assistant.

Low Latency HDMI Streaming on the Cheap

Getting HD video from one point to another, wirelessly and with low latency/delay isn’t cheap. The best-known player in the market, currently, for these kinds of tasks, is Teradek with their BOLT range. Unfortunately, an entry-level Teradek Bolt goes for around R 37500 in South Africa (about $2690). This isn’t affordable in a number of contexts, and as such I tried my hand at finding a cheaper solution.

A “cheaper solution” invariably involves commodity hardware, specifically commodity hardware that is also modular and modifiable – so open source. It’d need to be something supporting a wireless connection option. WiFi is ubiquitous, cheap and highly flexible.

Enter the Raspberry Pi Zero W…

Raspberry Pi Zero WCC BY 2.0

This tiny little PCB runs Linux and handily has a built-in H.264 encoder as well as Bluetooth and WiFi – cool! The RPI Zero W also sports a camera connector (Camera Serial Interface or CSI) Β and that got me wondering: had anyone found a way of getting video from an SDI or HDMI cable into a Raspberry Pi via the CSI interface ? The CSI interface runs directly to the GPU (which does the encoding) and therefore cuts out common CPU-intensive issues that arise when using USB interfaces.

Ah yes, the B101 HDMI to CSI adapter, made by Auvidea. This board handily converts an HDMI stream into a stream that looks like a CSI camera. This board looks like it’s Plug ‘n Play but I soon found out that that wasn’t the case.

Tons of trawling through various forums resulted in me eventually coming up with a partial solution.

You’ll need a specific copy of Yet Another Video4Linux Test Application (yavta). This Yavta sets some registers on the video encoder, starts the pipeline and reads out the results to stdout. That stdout can be redirected easily, I used socat (like netcat) to send the output out to another machine via UDP. This is the final command :

Run ./yavta -c -f UYVY -n 3 --encode-to=- -m -T /dev/video0 | socat - udp-sendto:10.0.0.20:5000 on the Pi and
ffplay -probesize 32 -sync ext -fflags nobuffer -flags low_delay -framedrop -strict experimental -i udp://10.0.0.20:5000 on the receiver

But, before running this command you paradoxically have to provide an EDID definition to the V4L drivers, like so :

v4l2-ctl --set-edid=file=1080P30EDID.txt --fix-edid-checksums 

and the contents of the EDID file above :

00ffffffffffff005262888800888888
1c150103800000780aEE91A3544C9926
0F505400000001010101010101010101
010101010101011d007251d01e206e28
5500c48e2100001e8c0ad08a20e02d10
103e9600138e2100001e000000fc0054
6f73686962612d4832430a20000000FD
003b3d0f2e0f1e0a2020202020200100
020321434e041303021211012021a23c
3d3e1f2309070766030c00300080E300
7F8c0ad08a20e02d10103e9600c48e21
0000188c0ad08a20e02d10103e960013
8e210000188c0aa01451f01600267c43
00138e21000098000000000000000000
00000000000000000000000000000000
00000000000000000000000000000000

The weird part is that this works for any resolution and frame rate provided it is progressive (not interlaced) and is part of the HD-family of resolutions (namely 1920×1080 and 1280×720, I haven’t tested the ugly sister 1440×1080).

Audio, via I2S requires a whole new realm of heartache and I found it to be generally unreliable.

The result is a feed which shows a delay of 10 frames on a 1080P 25fps stream. This is about 400ms – which isn’t great, but considering it’s going from a camera, through an encoder, out via WiFi to an access point, through a switch, through a router, through a switch and then being decoded on another machine, I think the result is a decent first start.

The next step is to experiment with low latency options in the Pi’s H.264 encoder and also test the latency when the link is peer-to-peer.

The most interesting indication I’ve found of low-latency GOP options on the encoder is the register

MMAL_PARAMETER_VIDEO_ENCODE_H264_LOW_LATENCY

in mmal_parameters_video.h but so far it doesn’t seem to have any effect.

AuroraDAO’s Aurad on an arm64 Raspberry Pi 3B+

Recently, AuroraDAO launched their tier 3 staking for their decentralised exchange, IDEX.

The software required to participate in their staking system is relatively simple; it takes the form of a docker-compose recipe that launches three containers, namely Parity (in light mode), MySQL 5.7 (not MariaDB) and a container running their software on Node. I tried running this software on an Intel i5 NUC thinking that it’d require some reasonable hardware to work properly. Some users started asking if it was possible to run aurad on low-power hardware, like a Raspberry Pi. Initially I thought this wasn’t viable… but then I started looking at the utilisation on my i5 NUC and realised it had barely any utilisation – staking on a Pi might be viable after all…

As an experiment I set about trying to get aurad running on an Asus Tinkerboard, which is a 32-bit quad-core arm device with 2GBs of RAM (1.8 GHz default clock). The result was successful and aurad runs really well on it. I then rebuilt the aurad setup on a testing image of Debian’s Buster release, which is arm64… and surprisingly that also works really well. Amazingly the arm64 architecture has better support than armhf (32 bit) in a number of areas.

So for those who are willing to get their hands a little dirty, here’s everything you need to get started with aurad and a Raspberry Pi 3B:

You’ll need my spiffy ready-to-go Raspberry Pi image : https://storage.googleapis.com/aquarat-general/aurapi.img.xz

Decompress and write the image to a suitable microSDXC card. You’ll need something that’s at least 32GBs in size. I based my tests on a Samsung EVO+ 128GB microSD card. Note that your Pi3 will have to work very hard to run this image, so make sure it has a good quality power source. I’ve been powering mine through the headers directly.

Once the image has been decompressed and written you can stick the SD card into your Pi and power it up. It’ll get an IP from your DHCP server (I haven’t tested it with wifi). Once it has an IP, log in :

ssh debian@yourpi (password raspberry).

Once you’re logged in, configure aurad :

aura config

Once configured, start aurad :

aura start

It’ll take a little while for the containers to start and then it’ll take some time for the machine to synchronise. You can check the sync progress by running :

docker logs -f docker_aurad_1

aurad running on a Raspberry Pi 3B with an arm64 kernel.

The image supplied here relies on some modifications to Aurora’s script. The docker-compose file has been modified to use mariadb’s dockerhub repository (specifically MariaDB 10.4), as MariaDB supports arm64 (and is better :P). Aurad’s docker image has an amd64 dependency hard-coded, so this was rebuilt with a modified dockerfile which uses an armhf (32 bit) dependency. Parity only supports x86_64 as a target architecture on their dockerhub repository, so I rebuilt this using a customised dockerfile (rebuilt on an arm 32bit device… it took a while).

RAM is a bit scarce on the Pi3 so a swap file is a good idea (most of the RAM contents are inactive). This is after 6 hours of uptime. The machine seems to limit itself to 540MB of real RAM usage.
25% of the system RAM is being used as cache… which isn’t undesirable.

It should go without saying that Aurora doesn’t support this image and that by using this image you’re trusting I haven’t embedded something funky in the images. Also, updating the containers will involve a little bit of fun.

You shouldn’t need a heatsink for your Pi; my Pi says it’s running at 55 degrees C currently (in a 26 degree C room).

The major resource hog is Parity, which is responsible for around 20% of the machine’s RAM usage. I suspect moving Parity to another ARM SBC would free up a lot of resources, improve stability and would still use far less electricity than a “normal” x86 machine (10W vs 100W?).

Good luck!

Post image taken from Wikipedia which in turn got it from Flickr, created by ghalfacree at https://flickr.com/photos/120586634@N05/39906369025. It was reviewed on 16 March 2018 by FlickreviewR 2 and was confirmed to be licensed under the terms of the cc-by-sa-2.0.

Humon Hex Bluetooth Protocol

AKA Reverse Engineering the Humon Hex Muscle Oxygenation Sensor’s Bluetooth Protocol

Athletes (or I suppose more generally mammals) have muscles. Muscles consume oxygen when they do work and output carbon dioxide into the host system’s blood. If insufficient oxygen is present, the muscle starts consuming glycogen, which is a somewhat finite resource and results in lactate as a byproduct of the consumption. Work done through the consumption of oxygen is aerobic work and work done with reduced oxygen is anaerobic work.

The transition between these two states is caused by a balance between a muscle’s ability to consume oxygen and the host system’s ability to supply oxygen to that muscle. Generally heart rate is the most-easily acquired indicator of whether or not the host system is struggling to supply enough oxygen to its peripherals, but heart rate has high hysteresis and varies per person, amongst other issues. As a result, Muscle Oxygenation “moxy” sensors are useful because they’re precise, provide absolute readings and they’re fast. They are analogous to reading a car’s engine RPM directly vs trying to figure out the RPM by looking at the water temperature.

Unfortunately, moxy sensors have historically been very pricey with units like the Moxy and BSX Insight in the range of several hundred dollars. A coach told me recently that athletes generally go to a lab to be measured (?!). A new company on the block, called Humon, has released a product called the Hex and the Hex does moxy. The Hex is less than half the price of its competitors. It’s also small and modern, with wireless charging. It’s generally a very very cool device.

A Humon Hex
The underside of a Humon Hex

The Hex transmits data on both ANT+ and Bluetooth Low Energy (BLE/Smart). The ANT+ variant of the data is standardised and easy to acquire if you have the correct radio to do it. The BLE variant of the data unfortunately is not standardised and Humon declined my request for the protocol specification… this guide is both to help others and a reminder to myself how the device works and more generally how to access BLE sensors on Linux.

I want a small logging device for my bicycle πŸ˜‰ but I don’t want something that has a display because I don’t want to be distracted. I just want the data for later review, so the logging device should ideally be small enough to be tucked away in or under the bicycle’s seat. In order to achieve this I figured I’d build a logging device out of THE AMAZING Raspberry Pi Zero W. The Zero W has a built-in wifi and bluetooth radio but said radio doesn’t support ANT+ and adding ANT+ would increase the size of the device, look crap and use more battery power. Bluetooth Low Energy is therefore the best option.

Everything that follows should work on any device running Linux with BLE support and running a recent version of Bluez (5.40 up).

Start by putting the Hex on you, press the power button once to start it up. The LED will rapidly fly through some colours and then go red. Double-push the button, the LED will go blue and after a while, it’ll go green. Green seems to mean the device is both calibrated and transmitting.

Get yourself a screen/byobu session : screen
Run bluetoothctl
In the interactive console :
power on – this powers on the BLE radio
scan on – this begins scanning for hardware
Wait for the device to show up as a detected device.

The hex will show up as “Hex XXXX”. This next step may not entirely be necessary :
In the terminal enter :
scan off – to stop the scan, we know what devices are present now
agent on – this is to enable pairing authentication
default-agent – this exchanges some keys but doesn’t ask for input
pair 00:00:00:00:00 – replace the zeroes with the mac address of your Hex

The device should now be paired.
connect 00:00:00:00:00 – connects to the device
info – if you want some cool info:
Name: Hex A2C6 Alias: Hex A2C6 Paired: yes Trusted: no Blocked: no Connected: yes LegacyPairing: no UUID: Generic Access Profile (00001800-0000-1000-8000-00805f9b34fb) UUID: Generic Attribute Profile (00001801-0000-1000-8000-00805f9b34fb) UUID: Device Information (0000180a-0000-1000-8000-00805f9b34fb) UUID: Battery Service (0000180f-0000-1000-8000-00805f9b34fb) UUID: Vendor specific (0000f00d-1212-efde-1523-785fef13d123)

This next part requires a “characteristc”. I’m going to demonstrate the 0000deef-1212-efde-1523-785fef13d123 characteristic, but the others I’ve looked at are listed at the bottom of this page. the deef characteristic is listed in the Humon Hex APK source code as HUMON_CALCULATED_DATA_CHARACTERISTIC.

In the terminal : select-attribute /org/bluez/hci0/dev_F5_63_A2_C6_8D_8D/service001a/char0024
and then read. The result will look like this :

And yes, I gave some thought to whether or now I should leave the MAC addresses in… it’s a moxy sensor πŸ˜€

The resulting values count as 16 bytes in total, which seems like… a float maybe ? I couldn’t figure it out easily, so I grabbed a copy of the Humon Hex Android APK and decompiled it. It took a lot of digging as the app is a React Native application with most of the logic minified into a horrible blob of Javascript… BUT grep exists, so yay. After much grep’ping I came across this :

apk/assets/shell-app.bundle:__d(function(E,R,_,A,T){Object.defineProperty(A,"__esModule",{value:!0});var C='0000-1000-8000-00805f9b34fb';A.BleUuid={DFU_SERVICE:"0000FE59-"+C,HUMON_DEVICE_INFORMATION_SERVICE:"0000180a-"+C,HUMON_MODEL_CHARACTERISTIC:"00002a24-"+C,HUMON_SERIAL_CHARACTERISTIC:"00002a25-"+C,HUMON_FIRMWARE_VERSION_CHARACTERISTIC:"00002a26-"+C,HUMON_HARDWARE_VERSION_CHARACTERISTIC:"00002a27-"+C,HUMON_SOFTWARE_VERSION_CHARACTERISTIC:"00002a28-"+C,HUMON_MANUFACTURER_CHARACTERISTIC:"00002a29-"+C,HUMON_DATA_SERVICE:"0000f00d-1212-efde-1523-785fef13d123",HUMON_RAW_DATA_CHARACTERISTIC:"0000beef-1212-efde-1523-785fef13d123",HUMON_CALCULATED_DATA_CHARACTERISTIC:"0000deef-1212-efde-1523-785fef13d123",HUMON_COMMAND_CHARACTERISTIC:"0000abcd-1212-efde-1523-785fef13d123",HUMON_STATE_CHARACTERISTIC:"0000abc0-1212-efde-1523-785fef13d123",HUMON_BATTERY_SERVICE:"0000180f-"+C,HUMON_BATTERY_CHARACTERISTIC:"00002a19-"+C,HEART_RATE_SERVICE:"0000180d-

This told me what the characteristics on the device do. EVEN MOARRRRRR grep’ping later I found some of the code the app uses to reconstruct the data from the device. This is the cleaned up version :

groupNBytes = function(bytesArray, sizeOfGroup) { var n = Object.keys(bytesArray).map(function(sizeOfGroup) { return bytesArray[sizeOfGroup] }); return n.reduce(function(bytesArray, t, a) { return a % sizeOfGroup == 0 && bytesArray.push(n.slice(a, a + sizeOfGroup)), bytesArray }, []) }

byteArrayToFloat = function(r) { var e = r[3] << 24 | r[2] << 16 | r[1] << 8 | r[0], n = new ArrayBuffer(4); return new Int32Array(n)[0] = e, new Float32Array(n)[0] }

Take the values from the terminal, build an array with them and then curry them together to get something cool :
[0] 37.44892501831055
[1] 68.58602905273438
[2] 0.6468204259872437
[3] 3

In this case [2] very closely matches the value my Wahoo ElMENT Bolt showed when I executed the read command in the terminal (multiplied by 100x).

You can stream these values by entering notify on once the attribute has been selected.

That’s about it for now, the next step is building a logger.

P.S. The battery level can be found on this characteristic :
select-attribute /org/bluez/hci0/dev_F5_63_A2_C6_8D_8D/service000b/char000c
0002a19-0000-1000-8000-00805f9b34fb

Update: 12 February 2020 : Humon shuts down and leaves users stranded with old device firmware

Humon sent an email (quoted below), essentially saying they’ve shut down (not shutting down but rather shut down). With no advance notice they took all their public facing services down including the backing services for their web, Android and iOS apps. This also includes the resources used to do firmware updates.

Many Humon Hexes have subsequently hit the market and been snapped up (they’re awesome devices). Unfortunately many of these devices have old firmware on them. I recently received one such device and it *was* unusable without a firmware update.

Humon’s servers are down but fortunately their iOS app, which has also been removed from the App Store, caches firmware update files. As a result I now have a second Hex with updated firmware on it. This information has been relayed to another user who has successfully extracted the firmware update/DFU zip file from his iOS device.

The letter:

Dear Humon Athlete,

I’m reaching out with an important update about the future of Humon.

We started Humon in 2015 with the mission of empowering people with the body insights that they need to become their better selves. After years of research and development we released our first product, the Hex, in 2018. In the years that followed we were lucky to count amongst our customers some of the most talented athletes, professional teams, gyms, medical centers and academic researchers in the world. These people were able to leverage the Hex and Humon's software and algorithms to improve their performance, reduce injury and push the world of research forward. To this day we remain convinced that muscle oxygen is the best metric of exertion that exists.

That said, it is still a new and somewhat misunderstood metric that requires sustained levels of market education to exist. Sadly, Humon will no longer be able to further develop this technology and make muscle oxygen available and understandable to the world.

As of February 13th, 2020 we regrettably have no choice but to shut down most of the Humon service. Our iOS and Android mobile application will no longer be available for new downloads on the Apple App Store and Google Play Store, our cloud backend and web platform will be shut down, and our support channels closed. That said, you’ll still continue to be able to use your Hex with your Garmin data field that will remain available to download on the Connect IQ Store.

We understand that this comes as a major disappointment to those of you who do not use Garmin products but it is the necessary path forward today. It is also why we stopped selling the Hex in early January, as we began to realize that this would be the case.

This is not an uncommon story in the world of startups, but it is also how innovations can flourish and end up benefiting millions in the long run. On behalf of the Humon team we wanted to thank you all for you trust, support, and help in bringing this product to market. Together, we’ve written a chapter in the history of muscle oxygen.

Best,
Humon